
Ukrainian Pink Beet Dough Varenyky with Sauerkraut (VIDEO)
- Innichka Chef

- Sep 23, 2025
- 6 min read
If you’ve ever wanted to bring a little extra color and joy to the table, these Ukrainian varenyky made with pink beet dough are the perfect way. The cheerful rosy hue comes naturally from beets, turning a beloved traditional dumpling into something vibrant and festive. Inside, you’ll find a simple yet deeply flavorful sauerkraut filling—tangy, earthy, and comforting.

My mom made sauerkraut once a year, every October. I deeply remember the tradition and how much of a big deal it was. Once a year, we filled a big barrel — not just for a little garnish on a Reuben sandwich, but to truly feed the family. Sauerkraut was one of the very few sources of vitamin C through the winter months. Eating seasonal wasn’t a choice, it was a must.
🥬 Please come and watch the full video of how I make sauerkraut today in my own Innichka Chef kitchen.
Have you subscribed to my cooking channel? Go and click here to be the first to see my new videos and THANK YOU so much for subscribing. It means a lot to me!
As I write this blog, I can’t help but think of my mom, who passed away just 40 days ago in my home country of Ukraine. Her loss feels like a wound that came at the most unwanted time, and because of the war I wasn’t able to be by her side. Food, though, has a way of carrying memory, and in every dumpling I fold, I feel her presence.
This dish varenyky with sauerkraut is more than just comfort food — it’s a bridge between the past and present, between tradition and creativity. These Varenyky which many know as Perogies, are a piece of my heritage reimagined with a touch of modern flair.

Have you subscribed to my cooking channel? Go and click here to be the first to see my new videos and THANK YOU so much for subscribing. It means a lot to me!
What Are Varenyky?
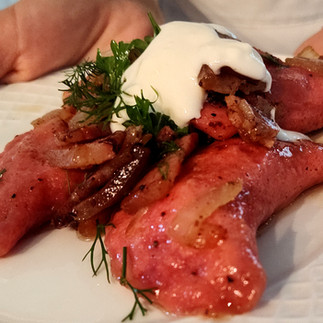
Varenyky (called in Ukraine and Pierogies in Polish tradition) are dumplings made by wrapping a thin, soft, tender dough around sweet or savory fillings. They’re a staple of Ukrainian cuisine, often filled with potatoes, prunes, mushrooms, cabbage, cherries, or farmer’s cheese, organ meats. Served with a dollop of creme fraiche or sour cream, fried lardons and fried onions, they are the ultimate comfort food.

The pink dough is less traditional—but Ukrainians love beets, so using their natural juice for dough is both authentic and artistic. It makes them especially lovely for holidays, family gatherings, or even a fundraiser table where they’ll surely catch eyes!

More recipes for Dumplings:


Let's do it...
Prep Time: 5 minutes
Making time: 30minutes
Cooking time: 10 minutes
Total time: 45 minutes
Yield: About 40 pieces
Author: Inna of innichkachef.com

Ingredients for the dough:
4 cups all-purpose flour
1 cup semolina flour
2 teaspoons baking powder (homemade aluminum free baking powder)
3 eggs
2 egg yolks
1/2 cup plus 2 tablespoons kefir, creme fraiche or sour cream
1/2 cup beet juice
2 teaspoons Celtic salt

Ingredients for the sauerkraut filling:
2 cups well-fermented sauerkraut (drained, chopped if long strands)
2-3 cup fresh cabbage, chopped
2 medium onions, finely chopped
1/2 cup Tbsp sunflower oil or butter
Freshly ground black pepper, and salt to taste
Few bay leaves
Ingredients for the serving:
150 grams lardons
1-2 onions, chopped
1/2 cup Tbsp sunflower oil or butter
Fresh dill, parsley for garnish
Directions for Varenyky with Sauerkraut:


Make the Dough: In a bowl, mix dry ingredients (flours, baking powder, salt) then add eggs, egg yolks, sour cream, beet juice. With a hook attachment knead lightly for 5–7 minutes.
Let rest the dough: Cover the dough with a plastic and let it rest for 20-30 minutes, while working on filling.
Prepare the Filling: In a cast iron skillet, heat oil and butter and sauté onions (half of the onions) until slightly golden. Add fresh cabbage, spices, and cook for few minutes. Then add sauerkraut, and the rest of the chopped onions. Cover and let it cook for 10 -15 minutes, stirring occasionally, until flavors blend and the filling is slightly caramelized.
Cool the filling: Cool completely before filling the dumplings.
Assemble the Varenyky: Roll out the dough on a floured surface to about ⅛ inch thick. Cut circles with a glass or round cutter. Place a spoonful of sauerkraut filling in the center of each circle. Fold over into a half-moon shape and pinch edges tightly to seal.
Cook Varenyky: Bring a large pot of salted water to a gentle boil. Drop in the dumplings in batches, stirring gently so they don’t stick. Cook until they float to the surface, plus 2–3 minutes no more. Remove varenyky with a slotted spoon.
Preparing for the serving: Meanwhile in the same skillet add butter, onions and lardons. Cook until onion is golden and lardons are crispy.
Serve Varenyky: Toss them with fried onions and lardons. Serve immediately.


Serving & Enjoyment varenyky with sauekraut
Serve your pink beet varenyki hot, with creme fraiche or sour cream on the side and maybe a sprinkle of fresh dill. The sauerkraut inside is tangy and grounding, while the dough is soft and slightly sweet from the beets.
They’re not just delicious—they’re beautiful, making them ideal for festive tables. Imagine a plate of pink dumplings served alongside traditional Ukrainian dishes—sure to spark conversation and delight.
Tips & Variations for Varenyki
Color intensity: Beet puree gives a softer pink; beet juice gives a more vivid magenta hue.
Make-ahead: Uncooked varenyki freeze beautifully. Lay them on a tray, freeze, then store in a bag for up to 3 months. Boil straight from frozen.
Other fillings: Potato with fried onions or mushrooms, prunes also look gorgeous inside pink dough.
Fundraiser idea: These varenyki stand out visually, making them perfect for bake sales, festivals, or cultural events.
🥟 How to freeze Varenyky?
Freezing varenyky works really well — that’s actually how many Ukrainian families keep them on hand for quick meals. Here’s the best method so they don’t stick together or fall apart when you cook them later:
1. Decide When to Freeze
You can freeze them:
Uncooked (raw dough + filling) → best for fresh taste and texture.
Par-boiled (boiled just until they float, then cooled) → safer if you worry about cracking.
Both ways work, but most Ukrainian cooks freeze them uncooked.
2. Prepare for Freezing
Place varenyky in a single layer on a tray or baking sheet lined with parchment.
Make sure they don’t touch each other, or they’ll stick.
Put the tray in the freezer for about 2-3 hours until they’re solid.
Once frozen, transfer them into a zip-top freezer bag or airtight container.
Squeeze out extra air to prevent freezer burn.
Label with the date and filling type.
3. Storage
They’ll keep well for up to 3 months in the freezer.
After that, the dough may start drying out.
4. Cooking Frozen Varenyky
Do not thaw before cooking.
Drop straight from the freezer into boiling salted water.
Stir gently so they don’t stick to the bottom.
Cook until they float and then give them 2–3 more minutes.
Drain, toss with butter or see the serving suggestions above, and serve.
A Taste of Ukraine with a Splash of Color
Traditional recipes don’t always need changing—but sometimes a small twist, like beet juice in the dough, can breathe new life into them. These pink beet Varenyky with sauerkraut (I used homemade) honor the heart of Ukrainian cooking while celebrating creativity and beauty on the plate.
Whether you’re making them for family, friends, or a special event, they’ll carry both the soul of Ukraine and a joyful splash of color.

Tip from Ukrainian kitchens
If you have leftover dough scraps after cutting out circles for your varenyky, don’t throw them away. My mom always used them to make vushka (literally “little ears”) — basically tiny, empty varenyky. They may not have filling inside, but once boiled and tossed with butter or served in soup, they’re still delicious and comforting.

Nothing goes to waste, and you get a taste of home.
Have you subscribed to my cooking channel? Go and click here to be the first to see my new videos and THANK YOU so much for subscribing. It means a lot to me!

Comments