How to make Red Cabbage Sauerkraut (Fermented Cabbage)
- Innichka Chef
- Apr 16, 2020
- 4 min read
Updated: Jun 19, 2024
I hope you'll make this recipe soon. If you do, please tag me #innichka_chef on Instagram, Facebook, Patreon or Pinterest.
Watch video how to make Ukrainian Sauerkraut in a Crock
Today I want to share my mom’s sauerkraut recipe with you. Sauerkraut is becoming quite the popular food these days as many studies show how powerful probiotics are and how important it is to consume them on a regular basis.

A lot of people consume sauerkraut just because it’s probiotic and it’s good for you (fermented cabbage provide you with way more vitamin C than fresh cabbage does). But sauerkraut is such an interesting food, food for long-lived!
When my mom came to visit me in the US for the first time, I asked her to make sauerkraut for me. Ever since then, I’ve been making my own sauerkraut (fermented cabbage). Many of my friends have tried it, and they love it!

Fermentation has deep roots in history around the world, but I want to talk for just a minute about the role of fermentation in countries from the former Soviet Union. If there’s one thing Russians (and other Eastern Europeans) love, it’s the taste of sour. When I mention that to people, I see their noses begin to wrinkle. Unless you’re talking about Sour Patch Kids or other candy, sour isn’t always a positive attribute for food in the English language. But it is in Ukrainian!
For Ukrainian peasants, sourness was the essential element in all food and drink. There’s the classic Ukrainian soup called Kapustnyak in which is soup made made with sauerkraut.

There’s the drink Kvass, which is a fermented drink made from rye bread. Fermented tomatoes, fermented pickles, fermented mushrooms, and many other fermented foods have been consumed by many Eastern Europeans for many centuries before the refrigerator was invented.
Growing up, my family always made one big batch of sauerkraut every year in October. And when I say a big batch, I mean it was enough to last us the rest of the year! Nobody ever talked about the health benefits of fermentation. It was just how we survived the winter without any fresh produce.
If you read my blog about making sourdough English muffins, you’ll remember that temperature has a big impact on the fermentation process for your starter. Since sauerkraut is fermented as well, fluctuation in your room temperature will also affect the time it takes for your sauerkraut to ferment. It can take anywhere from 5 to 14 days for your sauerkraut to be ready. The warmer the air, the faster bacteria and wild yeast will grow. Living in the south, I get to take advantage of the hot air during the summer months to help make sauerkraut that much faster.
Another way the temperature affects your sauerkraut (fermented cabbage) is that during the winter months, cabbages are less juicy and crisper with very strong leaves. During the summer, cabbage is more delicate, almost like iceberg lettuce. It's a lot easier to work with then. I always try to use cabbage from the farmers market, but sometimes I'll use organic cabbage if I have to get it from the store.
This recipe for Sauerkraut (Fermented Cabbage) is simple, and you don’t need many spices. I hope you enjoy it as much as I do! Let me know in the comments below!
MORE FERMENTS YOU CAN FIND HERE.
Prep Time: 5 minutes
Fermenting Time: 5 to 14 days
Total Time: 5 to 14 days
Author: Inna of innichkachef.com
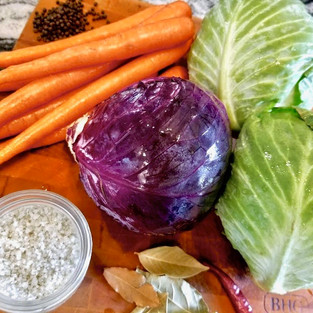
Ingredients for Sauerkraut (Fermented Cabbage)
3 heads regular cabbage
1 head red cabbage
5 carrots
3-4 tablespoons Celtic salt
2-5 bay leaves
1 tablespoon black peppercorns
1-2 chili peppers, dry or fresh (optional)
Ingredient Notes for Sauerkraut (Fermented Cabbage)
Salt
The most important ingredient is salt! Please, be generous with it. If there’s not enough salt you will get bad bacteria, and it won’t work because the good bacteria won’t be able to do its job. After mixing everything together and massaging it until the juice is coming up, please taste it. It should taste too salty to eat.
Directions for Sauerkraut (Fermented Cabbage)
1. Grate all cabbage and carrots on a mandoline. Chop chili peppers if you're using them.
2. Combine all ingredients in a bowl.
3. Massage ingredients with your hands until you see juice. The salt will help break down the fiber.
4. Transfer everything (including the liquid) to a glass or ceramic container. The juice should completely cover the cabbage. This is very important to provide a layer of protection so bad bacteria won't go through.
5. Place a heavy weight on your cabbage to continue pressing it (I used my mortar as you can see in the pictures above).
6. Cover everything (including the weight) with a kitchen towel and let it sit for 5 - 14 days (time needed may vary throughout the year). You do not need to refrigerate it while it ferments. It will start to smell sour after a few days, and you can give it a taste. Once you're satisfied with the taste, it's done!
Enjoy!

I hope you'll make this recipe soon. If you do, please tag me #innichka_chef on Instagram, Facebook, Patreon or Pinterest.


